Assembly of Breakdown Display
| You will need a Philips screwdriver or equivalent for the assembly. Please read all the instructions thoroughly. The breakdown display is designed to be convenient, sturdy and stable and to carry more then the weight of 60 Cedar Cooking Plank packages. It is important that the display is assembled properly in order to insure these qualities. | ||
| Before you start,
make sure you have all the parts: 2 - side pieces that look like ladders 1 - Display Sign Frame with a flat 1 x 5 attached to the bottom 1 - pack of 10 screws 1 - tall stack of 10 - 1 x 5 cedar boards 1 - short stack of 5 - 1 x 5 cedar boards with holes drilled in the ends This short stack will have a black mark on one side of the tape that holds the stack together. Locate the black mark and remove the two boards directly under the mark and set them aside, they are to be used for the shelves (described later). |
||
| How to Assemble | ||
1 |
Start by laying all the pieces on a flat surface like in Figure #1. The two side pieces will have a channel that runs down the inside which is the inside of the back of the display. There are also channels in the shelf cross members. These channels are on the top for the shelves to fit into, refer to Figure #2. In Figure #2, you are looking at the bottom of the back right leg of the Display (laying down, obviously). | |
2 |
Tilt up one of the side pieces (like in figure #1) so the channel is on the floor. Insert one of the three cedar boards from the short stack that has a hole drilled in the ends so the board fits evenly to the sides and to the bottom of the cross member (see Figure #2). | |
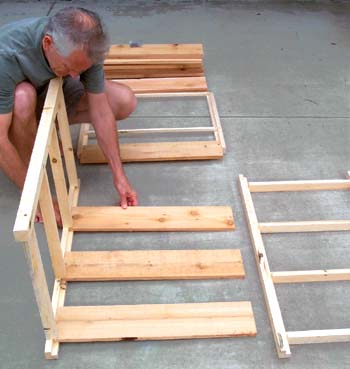
Figure #1
3 |
You can lay out all three back pieces like in Figure #1 before you screw the braces to the side frame or you can do them individually. Screw each side of the brace to the side members. After you have attached all three back braces using 6 screws (2 screws per brace), the display should look like Figure #3. | |
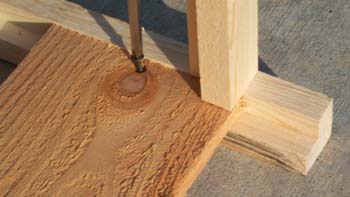
Figure #2
4 |
Next, lay the Display Sign Frame on the floor at the top of the display like in Figure #3. Slide the Frame into the channel on the top of the Display like in Figure #4. Slide it all the way in so the outside 2 x 2's touch. Screw the Frame to the Display using a screw at each end in the pre-drilled holes. | |
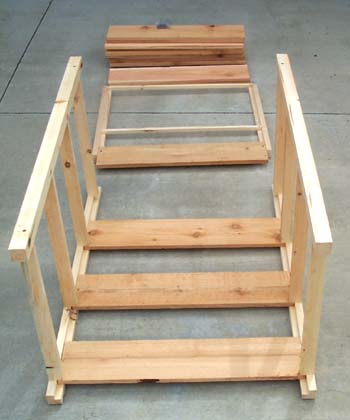
Figure #3
5 |
Slide it all the way in so the outside 2 x 2's touch (Figure #4A). Screw the Frame to the Display using a screw at each end in the pre-drilled holes. | |

Figure #4

Figure #4A
6 |
You can now stand the Display upright. Locate the two cedar boards you put aside from the short stack with the pre-drilled holes. Place one on the second shelf down from the top in the front like in Figure #5. Make sure that it is flush against the front upright and the side of the channel. This will keep the Display square. (Note: the hole is drilled at a slight angle from the middle of the board toward the shelf cross member.) Screw the shelf to the shelf cross member. | |
7 |
Place the other pre-drilled shelf board on the
front of the forth or bottom shelf just like you did with the second
shelf. Screw it to the shelf cross member, again making sure that it
is flush against the front upright and the shelf channel. You have placed all screws securing the Display. |
|
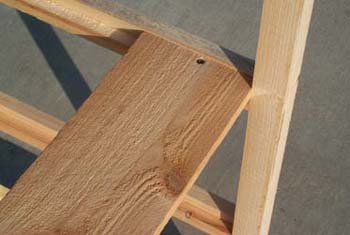
Figure #5
8 |
Place the cedar boards from the tall stack on
the shelves so there is space between each like in Figure #5. The shelves
will most likely fit very tight. It is intended to be this way as to
add extra strength and rigidity to the Display unit. If a shelf board
fits tight, put one end in the channel and use the butt of your screw
driver to lightly tap the other end of the board to get it to drop
into the channel. Your Display should look like Figure #6. |
|
9 |
To attach the Nature's Gourmet™ Display Sign, first stand two packages of Cedar Cooking Planks on the back of the top shelf like in Figure #8. Remove all 4 of the milk-white protective covers from the Velcro that is attached to the Display Sign Frame. Hold the sign so that it is about one inch above the top or the packages and centered left and right on the Frame as in Figure #8. Press lightly so if it is not straight, you can move it. Once you have it in place, hold the back of the frame and press firmly on the front of the Sign where the Velcro is to make a complete contact with the Sign and the Velcro. Do this to all four places where the Sign comes in contact with the Velcro. | |
10 |
Before you fill the Display, we recommend that you find an appropriate place for the Display in your store. Our experience shows that the stores that are selling the most product are those that have the Display near the front of the store facing the consumer as they enter the store. Some stores have elected to have them near the checkout stand and find that this is an excellent location for volume sales. | |
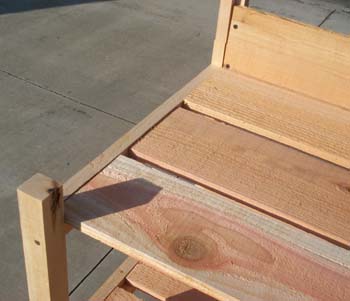
Figure #6
| To fill the Display, simply stand packages
up as in Figure #8 side by side on the shelf. In order to have
60 packages on the Display, you want to have two rows of seven
packages per shelf with one in front of the two rows in the center
(again, like in Figure #8). This configuration will give you 15
packages per shelf. Thank you! Happy Selling. |
||
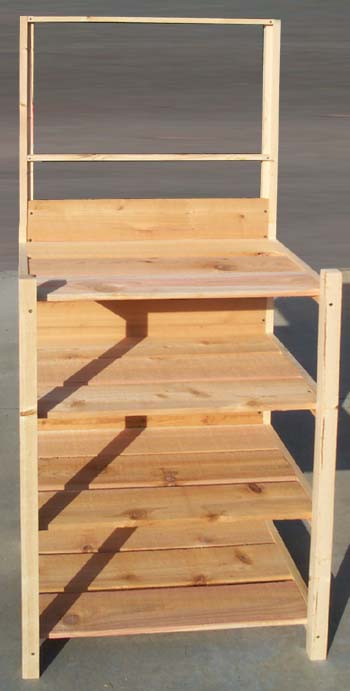
Figure #7
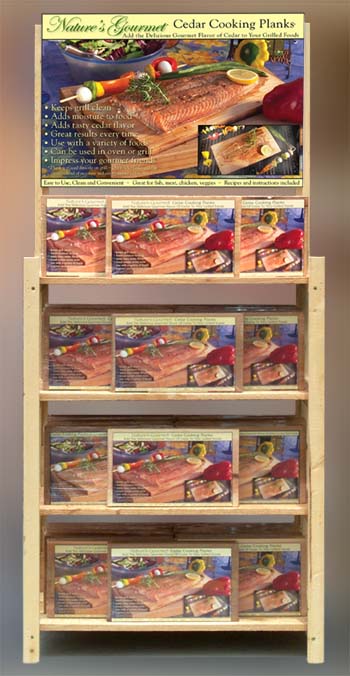
Figure #8
Questions or problems?

Call 866-522-3093
Write to info@gourmetplanks.com
Call 866-522-3093
Write to info@gourmetplanks.com
Gourmet Cooking on
Nature's Gourmet™
Cedar Cooking Planks
A product of
Cedar Import
info@naturesgourmet.com
© Copyright 2004 -2008 Cedar Import
All Rights Reserved
Thank you!